The Admin Page is the control hub for your Online Ordering Portal; mix and match the settings and options below to configure the customer experience to suit your clientele and your business!
This guide is a directory of the feaures and settings that can be found in the Admin Page. Here you'll find a brief description of the function and, if applicable, a link to the associated tutorial containing a detailed overview of the setup/update process and info on any additional requirements.
Company Info
- Business Name and Address - This is the main company information displayed on the Login screen and Main Menu of your portal. If you need to update this information, please follow the guide Update Portal Company Address or Business Name
- Logo - This image will be displayed alongside the Business Name and Address on the Login screen and Main Menu. A tutorial on updating the portal logo is available here: Update Portal Logo
- Welcome Message - This message will greet your customers in the Main Menu and whne they're selecting the delivery date for the order they're placing. This is a great spot to put information on promotions, new products or other pertinent information. To learn how to update this message, please see Update Portal Welcome Message
Cutoff Times
- Cutoff Times - Cutoff times are the way to manage and enforce ordering deadlines so to ensure that orders come in with sufficient time to produce and/or send them out. To learn how cutoff times interact and how to set them up, please see Configuring Cutoff Times
- Cutoff Message - The Cutoff Message is displayed when a customer tries to place an order after the deadline has passed. Steps to update the cutoff message can be found in Update Portal Cutoff Message
Non-Delivery Dates
- Non-Delivery Dates - Non-delivery dates are exceptions to your regular delivery schedule which can scheduled in advance. This allows you to prevent orders being placed for delivery on a date that you might be closed, such as a holiday, and provide an explanatory mesage. A tutorials on adding non-delivery dates is available here: Add OOP Non-Delivery (Blackout) Dates
Additional Settings
- Date Format - Use this drop-down to select the shortened date format used by the portal. We've listed out the official date format for each country, but if you can select another format if desired. The portal will default to MM/DD/YYYY date format if none is selected.
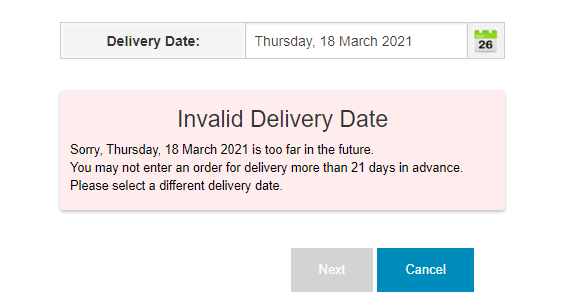
- Days Allowed to Order Ahead - Enter the number of days that you would like your customer to be able to order in advance. The portal will not allow them to exceed this limit when placing a new order. If they try to do so, a message will inform them of why they are prevented from continuing, and how many days they can order ahead.
- Minimum Order Value - Checking this box will cause the portal to enforce the Minimum Order Value. There are two places this can be defined: the default order minimum amount in FlexiBake Preferences, and the customer-specific minimum order which only applies to that customer. Check out our tutorials to learn more: Minimum Order Amount and Set Customer Minimum Order Amount
- If both the customer and default order minimums are defined, the customer order minimum will be enforced.
- Allow Item Comments - Checking this box will allow customers the ability to add a message to a specific product, for example if you allow special requests.
- Use Web Portal Categories - Web portal categories are alternate customer-facing categories that can be used iinstead ofyour FlexiBake product categories. For example, you may want Levain breads to be separate from Pain De Mie breads in FlexiBake for reporting purposes, but for the customer to only see a "Breads" category in the portal. The tutorial Web Order Categories covers how to create and assign web portal categories, and how to enable them.
- Use Delivery Days - Checking this box will cause the portal to enforce the available Delivery Days indicated on the customer's order details. Delivery days can be configured on a per-customer basis using the steps found in Set Up a Customer's Delivery Days (Online Ordering Portal)
- Disable Notes Fields - Checking this box will disable the Sales Order notes field
- Hide Cutoff Times - Checking this box will hide the Cutoff Times display when a customer goes to place a new order.
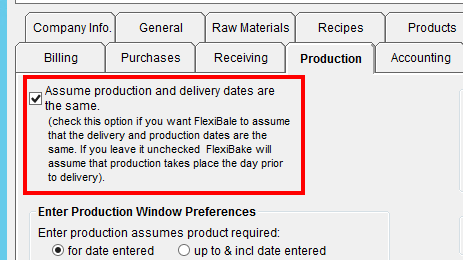
- Same Production and Delivery Date - Please do not enable this setting unless your FlexiBake Production preferences also have this setting enabled. This setting allows the portal to count the delivery day as a viable production day, rather than starting from the day before as is the default. Effectively this will subtract 1 from the product lead time, allowing for same-day order and delivery.
If you're unsure about if this setting is right for you, please contact us at training@flexibake.com before enabling this setting and one of our agents will be happy to help. This setting is only intended for use when FlexiBake is set to operate the same way in Administration > FlexiBake Preferences > Production
- Add Other Products - This master switch dictates what products will be displayed by the portal when your customer clicks on the + Other Products or View All Products buttons. The first two options, Limit Shadow and Standing Order Products and Show All Web Order Product will apply to all portal customers regardless of their individual settings, whereas the final option, Use Individual Customer Settings will allow you to select on a per-customer basis if you would like all web order products to be available using the Hide View All Products setting on the customer's Web Order Info. Please see Add Other Products Master Setting for more details.
Administration > FlexiBake Preferences > Production
Email Settings
- Send Customer Notifications - Unchecking this box will prevent email confirmations from being sent to the email address indicated in the Web Order Info for that customer.
- Include Product Code on Confirmation Email - If you would like for both the product name and code to appear in the confirmation emails sent to your customers, check this box.
- Notify Email Address - The email address entered in this field will receive a copy of all confirmation messages sent to your customers to keep your company up to date on any new orders or changes. We recommend using your ordering department's email for this. This tutorial covers how to change the Notify Email: Set or Update Portal Notification Email Address
- Confirmation Email Footer - Enter your own message here to appear at the bottom of the confirmation emails. A tutorial on updating this message can be found in Update Confirmation Email Footer Message
- Enable Test Mode and Test Mode Email Address - If you're just getting started with the Online Ordering Portal, it's a great idea to try it out in Test Mode before rolling it out to make sure that you have your settings configured the way you want. When Test Mode is enabled by checking the box, all portal confirmation emails will be sent to the address entered in the Test Mode Email Address field. To find out more, check out Online Ordering Portal Test Mode
Portal Administrators
- Portal Administrators - Portal Administrators are the people who will be able to log into this Admin Page to make changes or updates. It's a good idea to have a couple Admins set up so that there's a backup in case the main person in charge is unavailable.